REVIEW: DaVinci Resolve Software
Posted on Nov 16, 2010 by Alex Fice
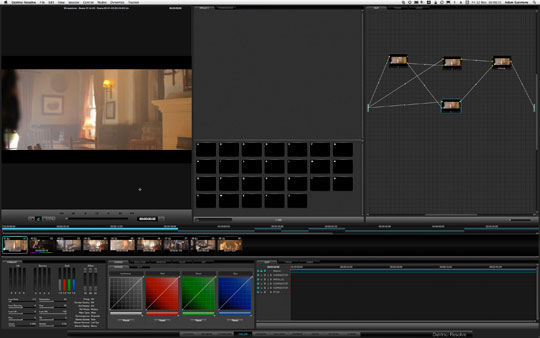
Resolve’s Color WindowIn 1965, Intel co-founder Gordon Moore made an observation that, a few years later, became known as Moore’s Law. Gordon was talking about transistors, but the rough upshot is that, for a given price, computers get twice as powerful about every two years. My mobile phone now has processing capabilities that would embarrass the mainframe I used at University, and that filled the top floor of a tower block, needed its own air-conditioning unit and three people just to keep it running. Interestingly the human operators were deemed expendable in the event of a fire, the doors locked automatically and the computer room was flooded with an inert gas, snuffing out the fire, and the lives of any unfortunate person who couldn’t get to the single cupboard of breathing apparatus. Though I was a computer nerd, it was a place I studiously avoided.
Moore’s law is pretty well known, but there is a less well known, compensating law – called the Great Moore’s Law Compensator (TGMLC). Basically, every generation of software bloats out enough to easily compensate for the increases in processing power. The most famous test of this was done in 2008, when the same tasks were performed in Office 2000, on a PC from 2000, and in Office 2007 on a PC from 2007. The 2007 performed the task half as fast as the 2000 machine, even though its specification had improved in line with Moore’s Law.
When Blackmagic Design bought DaVinci last year, the cheapest Resolve system was about $200,000. Resolve was the first DaVinci colour corrector to use off-the-shelf graphics processing units (GPUs – basically the chips on your computer’s graphics card) rather than racks and racks of dedicated hardware, and that $200 grand bought you just a single GPU. You would be looking at over $800,000 for a 16 GPU system.
You can see why a $995 (Jigsaw list price is £635 plus VAT), software only version of Resolve, running on a Mac, with an improved User Interface and support for all the Apple CODECs, like ProRes, caused a bit of a stir. This was Moore’s Law on Acid. Blackmagic’s CEO, Grant Petty’s mission to reduce the cost of post-production seemed to have gone to his head.
If you have a MacBook Pro, you can use Resolve in its purely software form, but installing on a Mac Pro gives you the option of adding a secondary graphics card (Blackmagic recommend a couple) – Resolve will then use the GPU on that card for its calculations. You can also add one of Blackmagic’s Decklink HD Extreme 3D cards and grade in 3D! The software uses a USB dongle as its key, so you could keep a version on your laptop to try out ideas and then move to the full grading suite for the meat of the work.
Resolve is a full, multi-user grading solution, so the first screen you get to is the log-in screen. Projects are all stored in a common database, so this is where you control who gets access to what, vital if have several staff working on the same film and don’t want them to overwrite each other’s work, with the concomitant punch ups at the coffee machine.
Once you are logged in you have access to a variety of pages, selected by buttons running along the bottom of the screen.
The first page is ‘Config’. Unsurprisingly, it’s here where you set up all the technical details for your projects, resolution, frame rate and so on. You can save custom configurations and create projects in the database. A project can have any number of sessions associated with it.
The second, Browse, page is all about filing. The Media Storage panel details directories where you can access or store clips. Clips available in these directories must be added to the Media Pool in order to use them in the grade. There are a variety of ways of doing this, from just doing it manually, or by using the information in an EDL to select clips from a directory or sub-directories. For this to work, all clips must have unique names, even if they are in unique directories as EDLs don’t give directory information.
The Conform page is really where the guts of EDL management come into play. There are usually two different approaches to transferring a project from your NLE of choice to the grading suite. You can ‘bake in’ the edit – basically rendering out a single movie file which will, obviously, contain all your project’s edits, transitions, effects and so on. Alternatively, you can send some kind of reference to the original clips – an EDL, AAF or XML file. Each approach has its advantages and disadvantages. It is unlikely that your finishing suite ‘understands’ all the transitions and effects that you have used in the edit, so the EDL/AAF/XML approach usually requires the generation of a stripped down version of your timeline. After the grade is done, the graded clips are re-linked into the timeline and the transitions and effects are re-applied. On the other hand, the ‘baked-in’ approach generates a single file, so some method must be employed to regenerate the timeline in the grading application, so, for instance, grades can be applied to individual ‘clips’ in the scene.
Resolve allows for both approaches. You can load an EDL that will reference clips in the Media Pool, though EDLs are pretty limited by today’s standards. Indeed, this simply didn’t work on a couple of projects I tried, as I had clips with broken timecode and duplicate clip names. A better approach is to use AAF – Final Cut users will need a plug-in from Automatic Duck or Boris. AAF references clips including directory information, so duplicate names don’t cause a problem. It also includes support for some transitions so on. Import the AAF into Resolve and it will rebuild the timeline that you had in your NLE, referencing the same clips.
If you prefer the ‘baked-in’ approach, simply export an EDL from the same timeline from which you generated the movie file. Resolve can then use that EDL to split the continuous movie into its individual clips. Neat! Even if you don’t have an EDL, Resolve can cut your video into clips with automatic scene cut detection (in Resolve’s Scene page). There are some simple editing features available in the Conform page as well, though I think I would always go back to the NLE.
The ‘Color’ page is where you do the guts of your colour correction work. Resolve is node based, rather than having the ‘Rooms’ of Apple’s Color. Each node is a full implementation of the colour corrector, including tracking, keys and so on. You can have as many nodes as you want (though real-time rendering will eventually give up if you add too many) and nodes can be added sequentially – where a ‘down-stream’ node only has access to the corrected image from a previous node – or in parallel, where each parallel node is fed with the same image data. This achieves the same results as having Primary Rooms, Secondary Rooms etc., but (to me at least) seems far more logical.
Resolves Color page has panels for viewing the clip, complete with transport controls, variable split screen etc., an area for storing reference stills and grades that you may wish to apply to a number of clips, the node viewer, a timeline and the main colour correction controls.
The Primary tab of the colour correction controls has sliders for the normal functions of Lift, Gamma, Gain and so on. A notable exception to the user interface are colour wheels for controlling these functions. It is, undoubtedly, possible to colour correct using these on-screen sliders, but it’s obvious that to get the job done efficiently you’ll need a hardware control surface. Probably the most functional, and least expensive option is the Tangent Wave www.tangentdevices.co.uk. It’s a bus powered, USB device that integrated closely with Resolve – no need to load any drivers, just plug it in and tell Resolve that its connected in the Preferences. The three trackballs control Lift, Gamma and Gain as you would expect with the other Resolve controls mapped to soft buttons and encoders.
Resolve includes Photoshop style Levels Curves for Luminance and RGB as well as soft clipping for highlights and blacks and between these and the traditional, trackball functions, basic colour correction is very straightforward.
Alongside the Curves are tabs for generating keys (Qualifiers) using HSL, Luminance or RGB. Each node in your graph also has key outputs and inputs, so you can use the Qualifier output from one node to generate a key for another. You could, for instance, use a node to generate a Qualifier based on skin tone, perhaps bounded using a shape (or Window in Resolve parlance). Feed this key into two parallel nodes, invert the key in one node (in the Key tab of the Color page) and you have the ability to independently grade skin tones and the rest of the image. Easy.
Windows can be circles/ellipses, rectangles, polygons or spline curves. As you would expect they have internal and external softness and can be scaled and rotated. One of Resolve’s most outstanding (and astounding) features is the tracker that you can attach to these Windows. There is no complicated setting of tracking points, just put a Window on some moving object in your scene and select Track Forwards (or Backwards, of course) from the menu. The Window will be magically glued to the moving object, rotating and scaling as necessary. It’s fast, incredibly accurate and amazingly simple. If the track isn’t exactly as you would like (it almost always is) then you can edit it manually. I’ve never seen tracking so good in such a low cost product.
The final image control tab is Blur, which (perhaps counter-intuitively) also has the sharpen controls.
No colour corrector worth its salt would do without ‘scopes’, of course, and Resolve has a full set of vector monitors, waveform monitors, parade and histogram. You’ll need a second monitor to use them and not clutter up your primary screen, of course.
Grabbing a still adds it to the Stills pane. A Still includes, of course, the reference image of the graded frame that the playhead was over when the still was grabbed. You can use split screen in the viewer to check this reference still against any current clip that you are working on. However, the still also remembers the full node graph for the grade, so every still becomes a grading preset. You can drop a still into one of the memory slots in the pane below, or add it to the Powergrade tab. Powergrades are available to you (as a user) whichever project you are working on so, for instance, if you have a particularly good day-for-night grade, you can make if a Powergrade and use it in any project. The Gallery page gives you a more complete view of these stills.
The Viewer gives you a full screen (ish) view of your graded clip, along with controls for that amazing tracker.
The final few pages give you control of the Format of your input and output (perhaps to change blanking or resolution or add BITC), and tape deck control – if you have a powerful GPU and haven’t overloaded it, Resolve will render your grade to tape in real-time – and you can ingest material here. Resolve will also use the power of your GPU to render your graded clips to disc.
Revival allows clips to be selected to be sent to DaVinci’s film restoration product (a separate product to Resolve), though you can do some basic dust repair work to Cineon/DPX files from within Resolve.
If you are an Avid user, Resolve is a pretty compelling purchase, even if you need an extra software component to get it to work with DNxHD ($500/£320 – Avid’s fee for the CODEC apparently, nothing to do with Blackmagic). Resolve can grade RED RAW files straight out of the box.
If you use Final Cut Studio, you get Color for free. Resolve and Color are very different tools – Color understands FCP’s XML interchange, so it’s easier (potentially) to get a project from FCP into Color, though in real life, the process is never as smooth as one would hope. It’s probably easier to grade in Color without a hardware control surface, but then Resolve has that incredible tracker. I prefer Resolve’s nodes to Color’s Rooms (yes, I know Color has nodes too, but they aren’t really the same thing). Somehow, Resolve seems like a more coherent product. Even if you add a second GPU card for speed, a Tangent Wave (about £910 plus VAT) and a Decklink HD Extreme 3D (£620 plus VAT), the grading system is still going to be considerably cheaper than the ‘Grade 1’ monitor you’ll be looking at.
If you are still undecided, I’ll soon be blogging my experience of grading using DaVinci Resolve over the next weeks (and months) at www.definitionmagazine.com/dav-vinci-resolve/


