A LUT And How To Use It
Posted on Apr 30, 2010 by Alex Fice
Dan Mulligan Of Rogue Element Films Gives His advice On The Use And Abuse Of Look Up Tables (LUTs) in Digital Cinematography.
REASONS TO USE LOOK UP TABLES
1. Immediate on-set dailies via monitoring
2. A great starting position for final colour timing
3. On-set colour decisions can be made
4. Continuous colour pipeline from capture to post
5. Colour management
6. 1D or 3D LUTs for on-set viewing
7. 3D LUTs for print emulation
LUTs are an increasingly integral part of any film project, be it digital or film cinematography. For on-set work, software is now in place to aid DPs using 16 or 35mm film with their colour decision choices (Kodak LMS, G&D 3cP). We will look at how LUTs can be used from a DP or camera operators viewpoint. This includes the benefits that LUTs bring to the production, the equipment needed to implement LUTs on the set and the differing ways of using LUTs through to post-production.
A basic view on LUTs
It’s important to understand that firstly this is not grading on set. The grading is done in the post facility with something like a Baselight. What we are doing is interpreting the colour intention of the photography as it is shot to give the grading and post team a good base from which to start from. We are creating a continuous colour pipeline from on-set colour decisions all the way through post, and thus keeping the intents of the DP from the set through into post. Important colour decisions made on-set can now be visually interpreted by post with a clear understanding of the DP’s intentions.
Essentially colour management
Things may change further down the line, but the DP’s decisions made on-set are now clear to all. Although talented graders need only a few seconds to correct an image, at least they have the DP’s colour ideas with which to start from – and it helps. Post houses can also help set LUTs before photography begins, leaving no doubt about how digital dailies and reference DVDs will look – this again helps DPs and post work together to achieve the same colour path. Digital Cinematography should try to retain the correct colour intention from acquisition, to on-set displays and through post production to final print release.
LUT Shoot Out
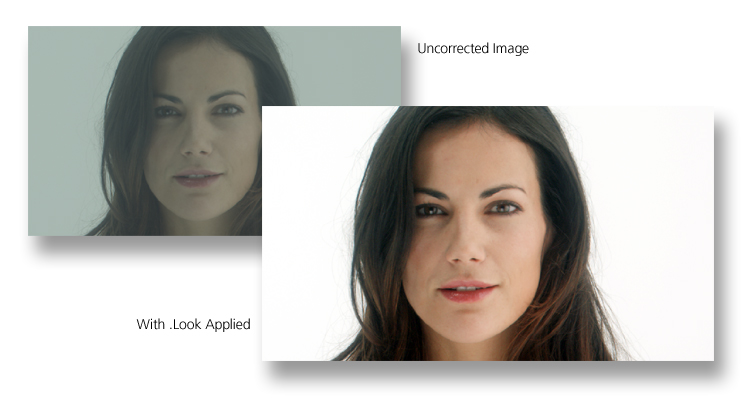
On a recent Viper shoot it became apparent that some form of on-set correction was needed to remove the Viper’s pastel green cast that is generated by the HD Stream and Filmstream outputs (this is best described as a green film base as opposed to the usual orange film base – a digital negative if you will. My main concern about these LUTs was the colour balance for 3200K and 5600K. To get the LUTs I needed whilst on location, certain hardware and software is required to create LUTs for correction.
Correcting a Still Image from the Viper
Firstly a CineTal 4:4:4 Dual Link monitor was used for viewing and LUT application. This particular monitor performs a couple of unique jobs to enable the correction of images to create the LUTs. Firstly it can capture a still frame from the Vipers output in DPX, JPG, TIFF, PNG and BMP formats. DPX files are captured at the full 1920×1080 7.9 Mb size of the individual Viper frame. Once this frame is captured on the CineTal screen (it freezes in capture mode), the image is saved to a USB memory stick. Take this image and plug the memory USB stick into a Laptop or PC (I use an Apple 17inch Powerbook). Using Speedgrade’s On Set software correction programme the DPX file is downloaded into the software to start correcting the colours. Once the grade has been done in Speedgrade, the new look is saved as a .look file back on to the original USB stick. Insert the stick in the CineTal, load the new LUT and look at the results. It’s possible to toggle between the LUT applied look and the raw, unprocessed Viper Filmstream look. That’s it really for correcting a still image from the Viper.
ON SET
So on set we saved the image, corrected via Speedgrade and loaded the LUT for viewing. This was done only twice on two saved images, one LUT for 3200K (studio image) and another for 5600K (on-location image). During the shoot, and looking at the raw output daily, it soon became the norm to just look at it raw. This told us more about where our image was responding best, albeit on a location monitor with varying viewing conditions.
We quickly learned that the LUT generated from one environment didn’t necessarily suit a new shooting location. The differences in ambient light or colour temperature changes meant that a LUT produced from one scene (studio or location) showed that the very same LUT didn’t really work for another scene. The slight shifts in colour temperature really did affect the LUT.
In the end we decided to keep the same LUTs all the way through. Otherwise we would have been generating LUTs all day for each change of scene, stage, location, day and so on. It was not practical. The difference in the look from scene to scene (warmer tones in one scene were rendered colder in another using the same LUT setting) were not of a major significance for us to keep generating new LUTs each time. We then stuck with the original two basic LUTs for the whole shoot.
This for me is a good example to highlight why viewing LUTs could be overplayed and possibly over-relied upon. They are electronic style filters that apply colour correction to the raw capture and essentially act as basic colour temperature correctors to give a more balanced image (in the Vipers instance, removing the green cast).
The other use for LUT is as a print LUT. Essentially viewing the image as it would appear once it has been through post and has gone out to print stock and print emulation.
Print Emulation LUT
So the other way to correct images on-set is by using additional 3d LUT boxes such as Truelight LUT box, Thomson’s LUTher or Kodak’s TCS (Telecine Calibration System) box.
Using the Truelight box with Filmlight’s Baselight correction software for Mac will give a relatively seamless integration from on-set colour interpretation (with LUTs worked through with the post house using Baselight) through to delivery of the Truelight LUTs in post and into grade. This keeps all colour decisions to one brand and in a single pipeline.
Generate a LUT using Baselight in the post house using frames grabbed from the test shooting. Take that LUT, place into the Truelight box and then take that on-set. View the photography on a calibrated monitor on-set with the Truelight LUTs applied through the LUT box. Rushes can be exported to post with the very same LUT used all day. Dailies and DVDs are delivered the next day with the same LUT applied to them – this is just lovely. This keeps the colour pipeline under one roof and ensures colour continuity through the whole process.
LUTher
Another way is using Thomson’s LUTher box. Technicolor’s Digital Printer Lights software is used to create the LUT and applied to the image on-set using the LUTher box. Once photography has finished, the LUT used on that day can be taken to the post team who will use this to create the corrected dailies and rushes for offline to edit with.
The two above examples means that two boxes should be used (one on-set and one at the post facility). There is slightly more expense involved, however it does afford the opportunity to get as close to the final print stock look of the movie, as can be reasonably expected given the on-set viewing conditions.
At the end of the day the reason for using LUT on-set is clear. It’s possible to achieve a very good corrected look to images giving a pleasant image to view while not corrupting the raw data capture. The raw data looks flat and pastel green with a Viper, but this yields the best results for grading. Naturally this hinders the on-set look, perhaps causing undue worry to the perceived image being captured, so the ability to correct those images and make them more pleasant to the eye resolves quite a few on-set potential headaches.
The ability to toggle between the two looks (raw for the DP and say corrected for the Director) is the best for both worlds.
Taking the other approach and creating print-look LUTS in collaboration with the post facility enables a closer approximation of the final desired look and keeps colour continuity from the set to post somewhat under closer control, with everyone agreeing beforehand the desired look.
The use of LUTs on the set of Miami Vice
Michael Mann on Miami Vice was shooting using the Vipers in their RGB 4:4:4 corrected mode. Even with a balanced look from the camera, print LUTs were still utilised and applied so Michael Mann could see, as best as that scenario can, what the final look was and not the camera captured look. This shows that using a Viper Linear 444 or perhaps a Sony F900R with a flat gamma curve, still in colour, LUTs can be used to bring out a look that would closer resemble the final graded look.
My conclusion is that LUTs are an extremely handy tool for making on-set colour decisions, made at the time of capture or decided beforehand, and then passing that information onto post. This gives the graders a starting point to move onwards with. At the end of the day on my project only two viewing colour correction LUTs (3200K and 5600K) were utilised for most of the time to correct the flat look on the screen. My experience of using LUTs meant that most of the time we didn’t utilise them and they sometimes hampered our progress (input from others on set), and the flat look suited us all fine. Bearing in mind the consistency of the raw capture and the slight inconsistencies with the basic CT View LUTs , the raw look won overall.
Also LUTs can in some cases take away around 1/4 to a 1/3 stop of highlights from the image that the LUT is applied to, and bearing in mind the fact that most on-set monitoring is only 8 bit (not 10 bit) what is seen on-set is not necessarily what will be seen in grade, especially the highlights, but as close as you can get given such circumstances.
Using LUTs is a quick way to see a corrected image on-set. Don’t use them as a final nailed-on image that will be seen in a theatre. They are a close approximation and are only a tool to help with colour decisions on-set. In post they are best used as a quick starting point for final grading and to offer corrected dailies (DVD) and offline edit rushes. Too many LUTs and some people will only confuse the issue and create unhelpful comment on the ‘look’.


