REVIEW: Magic Bullet Colorista II
Posted on Oct 7, 2010 by Alex Fice
Colorista’s KeyerIf there’s one thing that really makes my blood boil it’s seeing poorly graded programmes on the telly. There is really no excuse for it, particularly if you have any of Magic Bullet’s fabulous colour correction plug-ins for FCP. Probably the best known is Magic Bullet Looks, which is justifiably well regarded, but sometimes a more traditional approach to grading works better, and that’s where Colorista II comes in.
Anyone familiar with Colour (or even FCP’s built in 3 way colour corrector) will recognise the principles of Colorista II. There are three main sections, a Primary correction section, Secondary and Master. Primaries are usually used to correct exposure and colour balance from clip to clip in a scene, the Secondary section is for adding special effects (perhaps to turn that boring beige dress into a sexy scarlet gown), and the Master section can be used for an overall ‘look’. The three sections have subtly different controls.
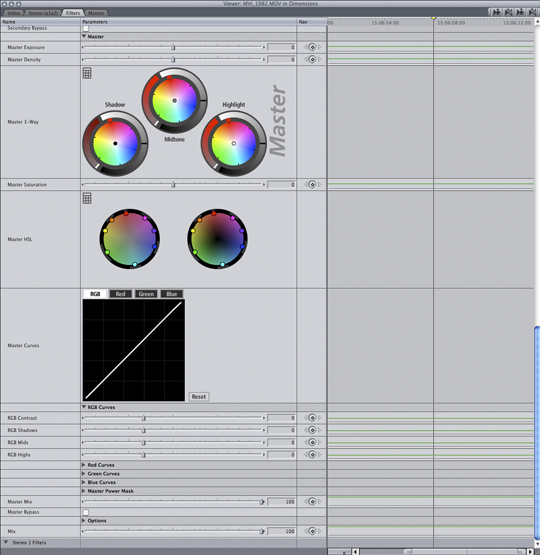
 Primary section screen grabThe Primary section gives you sliders for Exposure, Density and Highlight Recovery. Below these are the usual colour wheels for Shadow Midtone and Highlight. I really like the layout of these controls. The centre colour wheels has a movable dot very similar to those in FCP’s built in corrector – if you want the mids to warm up just drag the dot towards the warmer orange/red part of the wheel. If you want more subtle control, drag the coloured rectangle just outside the colour wheel to the warm segment. Now the quadrant to the left of the wheel is an intensity control for that colour tint. The rest of the outer part of the wheel is a control for level – just slide it to the lighter portion of the scale to lift the mids, for instance. Click on the little calculator icon on the panel and you get editable, numerical values for your adjustments.
Even greater control is afforded by the HSL panel below the 3-way. The left control changes colours, the right luminance. Each has some coloured dots (green, cyan, blue, purple, magenta, red, orange and yellow. If you grab a green dot in the left control and drag it towards the yellow, all your greens (wait for it!) turn yellow. Grab the green dot in the right control and drag it towards the centre of the wheel and the greens in your image get darker – you can drag the dot outside of the wheel to lighten colours. This is a really cool and quick way of changing colours without messing about with keys.
 Secondary sectionOf course, if you want to mess about with keys, the Secondary section of Colorista II lets you do just that. This section has a 3-way corrector control, just as the Primary section does, as well as a handy Pop control which does some interesting micro-contrast adjustments. There are Power Masks, which allows you to define rectangular or elliptical mask – your secondary colour correction will then only apply inside or outside this mask. There are the usual mask controls for position, width and height, softness and so on.
Below this section are the Secondary Key controls. Actually, most of the control is in a separate window which you open by hitting the Edit… button in the panel. The Keyer window shows you the current frame as Source, Matte and the Result of your key. The right hand side of the window shows a vectorscope with an editable region – the solid part of the region represents the solid key with the dotted area the ‘softness’ of the key. There is also a similar luminance strip – you can control whether the key is generated based on Hue, Saturation or Lightness, or any combination of these with the checkboxes. A simple way of starting your key setup is simply to drag a region over the colour you want to key in the Result window. You can add colours by selecting the big ‘+’ and painting on the image, or (unsurprisingly) remove colours with the ‘-’. It’s all very fast, very accurate and very intuitive – frankly one of the best implementations of an HSL keyer I have come across in a plug-in.
The only downside of the Secondary section is a lack of tracker for the Power Masks. It’s pretty unlikely that the face you are lightening, for instance, is going to stay still throughout the scene and, whilst all parameters are keyframable by hand, some automatic assistance here would have been nice. Of course, this omission may just be down to a limitation of FCP’s plug-in architecture, and it’s important to realise the low price point of this otherwise excellent plug-in. I’m just saying – is all.
 Master PanelThe final, Master, panel has the same 3-way and HSL controls as the Primary along with excellent Curves controls – both as combined RGB and separate colour channels. There is also a Master Power Mask, the same as the masks in the Secondary section.
Colorista II uses OpenGL by default (you can turn it off) to accelerate the plug-in effects, but it’s not a real time plug-in by any means. You’ll get a low resolution, low framerate version on a decent Mac Pro with FCP in Unlimited RT mode, but you’ll probably need to render the effect to really see what you have.
It’s really hard to fault Colorista II. As a plug-in there are some limitations – for instance I would like to be able to save “Master” settings to provide the overall look for a film, though you could use multiple instances of the plug-in, or apply the overall look first and then go back and tweak Primary and Secondary settings as a work-around. The excellent keyer and HSL controls really make Colorista II stand apart from lesser plug-ins, and it works in both FCP and After Effects (though no Avid version yet).
You can get the plug-in as a download straight from Red Giant www.redgiantsoftware.com at a cost of $299, or buy it as part of the Suite for $799 and get Looks, Denoiser, Frames and a load of other groovy stuff as well. For me, even though I generally grade in a stand alone application, Colorista II has become one of those must-have plug-ins for quick projects in FCP. I wouldn’t be without it.
Adam Garstone


