REVIEW: Blackmagic Design DaVinci Resolve 12 – The Editor
Posted on Sep 8, 2015 by Adam Garstone
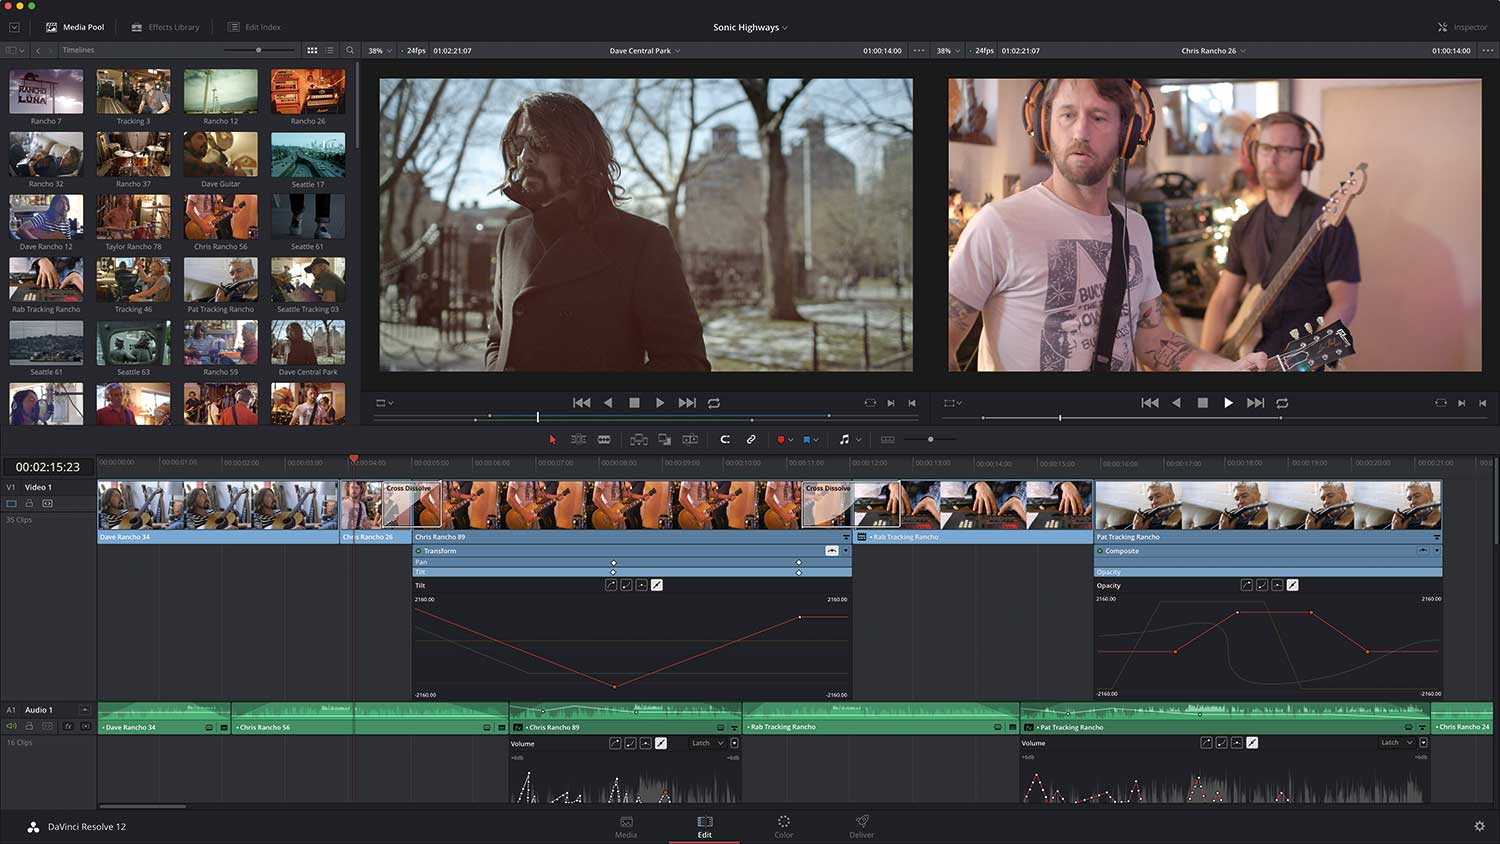
Resolve 12’s new EDIT page.
What can you say to a free piece of software that not only will grade your movie but now will also edit it as well. ADAM GARSTONE says hello and welcome to my studio.
My theory is that, a few years ago, Blackmagic Design realised that Resolve was turning into a Non-Linear Video Editor – almost by accident.
Grading software, like Resolve, always had to ‘understand’ the edit imported from Avid, or FCP or whatever, and it’s useful to have the user interface to allow the edit to be tweaked once it gets in to on-line – as a grader friend of mine once said, “If you ever find a Director who actually locks picture, please give her my name and number.”
So some of the abilities of an NLE kinda had to be there, to make a useful grading system.
And as the capabilities of the ‘source’ NLEs expanded it was useful if Resolve kept up with those new capabilities. At some point, you must get to a tipping point, and you start to develop the NLE features for their own sake.
So the previous release of Resolve, version 11, had a reasonable editor – certainly enough to do minor changes without having to go back to the off-line – and the editor was available in the free version.
The question was, could you start an edit in Resolve? Would it be possible to use Resolve as the only NLE for your prime-time TV show, or your latest Bollywood blockbuster?
Sadly, the answer was a pretty resounding “no”. It didn’t have the feature set that an editor needs nowadays and, particularly with larger projects, it became sluggish and annoying.
The latest release, Resolve 12, is being touted by Blackmagic as a real Non-Linear Editor – something you could edit a feature film or TV programme in, and then, of course, grade it in the same application. At the time of writing, v12 was a ‘public beta’ – we don’t usually review beta software, but in this case Blackmagic’s claims were too interesting to ignore.
Blackmagic have changed the names of the two versions of Resolve. The old ‘Lite’ version is now just DaVinci Resolve and the fully featured version is now Resolve Studio. The free version wasn’t particularly ‘lite’, so this better reflects the capabilities of the two versions. The one thing that has always bugged me it that there are two, separate programs for the two versions. Personally I would prefer a single application that enables Studio’s features if the dongle is plugged in, but otherwise works as the free version.
The first thing you notice about version 12 is that it had undergone a bit of a facelift. There are nice new fonts and a change of colour scheme, and it all looks very modern. Blackmagic have slowly but surely been whittling away the old DaVinci look – and some of the annoyances, like having to exit the programme to change which directories you looked for media in.
 Resolve 12’s new DELIVER page.
Even in beta form, it’s obvious that editing in Resolve is now much faster. I loaded up the timeline of a feature film I’d just graded in v11, and jumped straight into testing the things that made that earlier version unusable (or, at least, really frustrating) as an NLE. Zooming into the timeline (with audio waveforms and video film strip view enabled) is much faster in v12 beta – though it could still use some work as you approach maximum zoom. Audio scrubbing is also much improved – apparently there is a complete new audio ‘engine’, and the re-write seems to have paid off. Infuriatingly, however, audio playback is flaky when you use the cursor keys to step the playhead by a single frame, which makes it very hard to do a frame accurate audio edit – to cut between words, for instance. This seems to be worse on longer timelines, and may just be an indication of the beta nature of the current release. However, in this day-and-age, I would expect to be able to edit audio at the sub-frame level, which you can’t do. You can’t do it in Avid Media Composer either, but that’s no excuse.
Importing footage into a new project is performed in the Media tab of the UI. Other than the facelift, this hasn’t changed much and that’s a good thing. Resolve, of course, has become a favourite as a DIT tool, so you can clone camera cards, tweak metadata, sync sound, check your footage with video scopes, conform the video to other framerates (goodbye Cinema Tools) and so on. One great new feature is the ability to mark a directory as being a ‘Favourite’.
It’s worth noting that, with its legacy as an on-line grading tool, Resolve copes very well with most camera formats – I imported XAVC MXFs at 4k UHD resolution and dropped them straight into the timeline, playing back and editing this footage with no issues. The Media tab, of course, allows you to generate ‘optimised media’ for more performance should you need it. The format is set in the preferences – I used ProRes 422 at the original resolution. Resolve automatically uses the optimised media when it’s available, though you can seamlessly switch your timeline back to the original media should you wish.
Once your media is imported, hop over to the Edit tab and you are ready to, er, edit.
Blackmagic have taken a very sensible approach to the user interface for Resolve’s editing. It seems to pick the best ideas from most of the current batch of NLEs, without adding stuff that will scare the experienced editor. There are keyboard shortcut presets that mimic Media Composer, Premiere Pro, FCPX or Resolve’s own (which exhibits a startling similarity to FCP 7). Or, of course, you can define and save your own keyboard layout. After a decade of hopping between Media Composer and FCP 7, my Avid keyboard layout is bastard hybrid of the two, but I adapted to Resolve’s default very quickly and probably wouldn’t change it.
The Edit tab presents you with Source and Record monitors, a conventional, tracked timeline, with its track controls on the left, media and bin trees, and an inspector for changing parameters. There are also panels for the Effect Library, Audio Mixer, clip Metadata and a text version of the timeline (which can also show flags, markers, offline clips and so on). You can’t position all these windows freely, as you can with, for instance, Media Composer but you can turn the different panels of information on and off, and there are a number of options, including dual screen support. I usually use one screen solely for the timeline – I like to see all my tracks at once without scrolling up and down – so I was very happy to see that this was possible.
If you are using a single screen– Resolve is highly optimised for the retina screens of MacBook Pros – then there are very neat features. Turning on the Inspector for a clip in the timeline temporarily removes the Source monitor to preserve as much screen real estate as possible for the Record monitor – the only one you need to see at that point.
The media management panel provides conventional Bins, which can be arranged hierarchically. You can also set up Smart Bins, searching on pretty much any aspect of the clip metadata, from CODEC, to frame size, to scene or shot number, or keywords. These bins update automatically, so as you get more iPhone footage in, for instance, your iPhone Smart Bin will contain the footage.
Bins can be colour coded, but it doesn’t seem to be possible to reorder them – they appear in the hierarchy in the order in which they were created until you exit the project. Open the project again and they reappear, ordered alphabetically (probably a beta bug). Like Avid, this approach of ordering bins alphabetically results in bins called “+++++++MyBin” to keep them at the top of the list, which is ridiculous. Can’t we just drag bins into the order we want, and have them stay there?
 Resolve 12’s MULTICAM page.
All the footage in the Media Pool initially turns up in the Master Bin, from which it can be sorted into your bin hierarchy. Create a new timeline and, unsurprisingly, it appears in the Timelines bin.
A slight limitation is that the timeline settings (raster size, frame-rate and so on) are set in the Project Settings, so you can’t have timelines with different settings in the same project.
Nevertheless, the timeline layout is conventional and well thought out. Audio tracks can be mono, stereo, 5.1 or ‘adaptive’ (up to 16 track) and there there is a menu for showing audio waveforms, flags and markers, thumbnails in the video tracks and track heights. You can’t show audio waveforms on individual tracks – it’s all or nothing.
In the track control panel, tracks can be renamed, and there are controls for Auto Selection, track lock, track selection (controlling which tracks are used as the destination for an insert or overwrite operation) and mute. There is no audio solo button, but clicking on the mute whilst holding ‘alt’ mutes all other tracks – effectively a solo.
There is also a Master audio track corresponding to the master fader in the mixer.
Clip audio levels and pan can be keyframed in the timeline and, for more control, each clip features a drop down editor, where you can add and edit splines on the animation curves. The mixer also features Read, Touch, Latch and Write automation – the resulting keyframes are, again, editable in the timeline.
Assembling footage into the timeline is much as you would expect. Set IN and OUT points in the Source monitor and timeline as required – three and four point editing is supported including back-timed edits and Fit to Fill – then set up the track routing in the timeline controls and perform the edit. You can use the menu to do this, the keyboard shortcut or, like FCP 7, dragging the Source clip name to the Record monitor brings up a pop-up menu of all your options.
One really nice feature is ‘Place on Top’. This adds the clip to the next available empty track – irrespective of the track routing. As you mostly assemble into the bottom video layer, but occasionally need to lay a clip over the top, this is a brilliant, quick method of doing so without having to re-patch the track selects.
Trimming is equally simple and intuitive. ‘Normal’ edit mode performs overwrite edits – i.e. not rippling the timeline. In this mode you can move clips around and shorten/lengthen them, as well as performing roll edits of cuts. ‘Trim’ edit mode turns on ripple/insert editing and allows slip/slide edits – you select which you are doing simply by dragging the top or bottom of the clip. One feature I really like is the ability to slide multiple clips – the selected clips all slide together and the unselected clips either side take up the slack.
All in all, the editing experience is familiar, with no real unpleasant surprises and a few pleasant ones. The visual feedback from the user interface is clear and colourful, and all of the editing options are available with very little mode or tool selecting. There isn’t a trim editor as such, and many people will miss that, but JKL editing is available – and you can turn it on and off with a key press so that you can still play the timeline without performing an edit.
One new addition to v12 is Multicam and, once again, it behaves very much as you would expect. Select the clips in the Media tab and create the Multicam clip. You can choose how they are synchronised, and choose to move the original clips to another bin – nice if you have a lot of clips in a bin and (like me) get confused as to which you have done and which you haven’t. Drop your shiny new Multicam clip into a timeline, set the Source monitor to Multicam mode, hit play and pretend you are a live vision mixer – just click on the clip in the Source monitor that you want to cut to. You can, of course, trim the edits and change angles afterwards in the timeline. Opening a Multicam clip as a timeline allows you to adjust sync, for instance, and you can even add in more clips, and grade each angle separately.
There is a nice implementation called Take Selectors – similar to FCPX’s Audition feature. Simply designate any clip in your timeline as a Take Selector, then add additional clips from your bins, slipping them to were they need to be. A couple of clicks can then select between the clips, rippling the timeline if you choose – great to help you decide which clip works best in context.
As you would expect, you can create compound clips in the timeline. You can also drag a timeline into the Source monitor and cut it into another sequence – much as you can with Avid or FCP 7 – effectively creating a compound clip. You can then, should you wish, decompose that compound clip in place in the new timeline to get at the original clips and edit them as you please.
Clip retiming is very similar to the way it was done in FCP 7 – you place retiming keyframes in the clip and then you can change the speed between, and on either side of the keyframes. FCP 7’s frame interpolation, however, was pants – Resolve allows you to select an optical flow based interpolator for smoother slow motion.
Even better, Resolve has a ‘Smooth Cut’ transition which works in a similar way to Avid’s FluidMorph. This does a quick morph between the incoming and outgoing clips. It’s very useful if you are cutting a talking head – you can often get away with morphing over a cut rather than having to go to B-Roll. You can even edit the curve of any applied built-in transition with a drop-down spline editor.
Effects are, however, Resolve’s weakest point. The clip inspector allows you to resize clips and rotate them (in three axes), but there is no corner distort (vital for comping a clip with perspective). The built-in transitions are fine, and there is some basic text generation, but you’ll need to buy OpenFX plug-ins to do anything more groovy. Of course, given that you just got this fantastic NLE for free, perhaps paying for a few plug-ins isn’t that much of a hardship? And, perhaps one day Blackmagic will implement a “Send to Fusion…” feature, like FCP 7’s old “Send to Motion…”. Ooh, I like that idea. Please Blackmagic! Please!
Resolve has always had to ‘play well with others’. As a grading tool it has to have the ability to round-trip to other software. This has important benefits as the new NLE on the block – you know you’ll be able to pass your edit on to ProTools or (for some reason) other picture finishing software, or even hand it off to Media Composer. Whilst AAFs and EDLs and XMLs are rarely foolproof, there are other, more established NLEs that still don’t really work well in this area.
Revolve v12 is still in beta, and it shows in one new feature – Media Management. Like other NLEs, this should allow you to move, copy or transcode a project’s media and timelines, but it seemed very slow with a large (feature film) project, and reported odd numbers for the destination file sizes.
DaVinci Resolve v12 is a good editor. In order to use it for a big project there are one or two features I would need to see – like an extension to Resolve Studio’s collaborative framework to allow an assistant editor to add bins and media, and sync audio. However, even in beta form it was mostly fast and entirely stable. It looks and feels great to use, and I picked it up and became comfortable with it in half a day.
Blackmagic have built on the existing capabilities that Resolve already had to produce a surprisingly complete NLE package. And it’s free.
I’ll just say that again. DaVinci Resolve v12 is a very capable NLE – AND IT’S FREE.
Give it a go.
Next we’ll look at the new features of Resolve’s raison d’être, colour grading.


