Frame Forge 3D Software
Posted on Apr 22, 2010 by Alex Fice
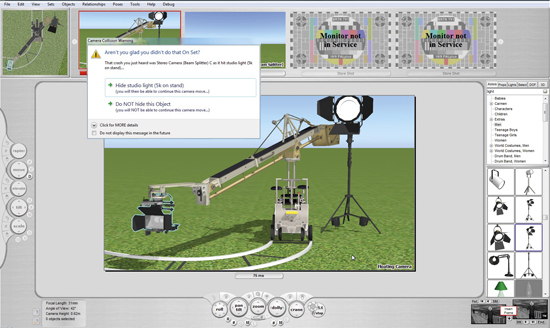
Frame Forge’s Live View Screen with annotationThe situation I’m in is that we will be filming an opera in 3D with the intention of giving it a theatrical release. But once you have decided to shoot in 3D all the camera positions you would usually use for a 2D DVD release won’t work. All those standard camera positions usually get by on great big cameras with long lenses right at the back of the stalls or on the sides – that arrangement just won’t work in 3D.
You have to get nearer the action in 3D but getting nearer will have serious implications for the audience, as you maybe taking seat space, and obviously commercially, less seats less money. They had already done some 3D tests in those positions and we agreed that you would get the same results from our tests. Our advice was ‘If you want to take this seriously these are the only positions that you can shoot this from’.
I wanted to ‘pre-viz’ it and see what it would look like and start our negotiations between all the parties involved once we see what it looks like using pre-visualization.
So I was charged with this assignment and five weeks to do it and told ‘here’s the kit you’re going to do it on’. I’d never open FrameForge Previz Studio 3 before which is important to say as it’s shows you how intuitive it is to use.
WHAT IT CAN DO
 The main purpose and the reason for using FrameForge above any other type of animation or any other software you could potentially use to simulate is that it is a ‘one- stop- shop’. In the box you have a whole load of cameras, camera equipment, that are simulated to spec. In your simulated world you can exactly control your scale and everything else so, for example, you can put say a RED camera on a Fischer dolly or on a Technocrane or on a particular head, on a particular track. Its precise to the point I could put a 5K light up or I can swing the barn doors shut to crop the light. All of that stuff you can do. So I can take all that and I can say faithfully that I know that from this position, that I discussed with all the technicians and stage managers, that I could put a camera here and here and I can go here. So from those positions I know very faithfully that I can get this shot.
The software is based on real world principles; I can telescope my Technocrane out, but it’s not like dragging a camera, it will stop and tell me that I can’t crane any further, and that you’re at the limits of the grip equipment that you’re on.
THE 3D ENGINE
 The stereo side of it goes hand in hand. It all depends on how detailed you want things to be. I probably shot myself in the foot a little bit because I always approach these things with a very ambitious nature and I have some skill set with some other 3D modeling software which encourages me.
But basically your interface is split in to two main screens, this is your live view which is the bulk of your working environment. You have a larger monitor in front of you and a number of screens above that represent your other camera positions. But the more you load it up, the slower it’ll work. The big screen at the front is what you’re currently locked in to or what you’re working on. So you’ve got all your 3D actors in there, your 3D environment. I personally created all that in Maya, FrameForge will import FBX files so you can create your own props and characters and import all that stuff if you’ve got the time. I had to create a scale model of the opera house and then I used their internal actors, which I textured myself. There is a facility to go in to the texture settings and colour and adjust them in Photoshop.
Our cast are in period costume, corsets, stuff like that. That was after Ken Schafer at FrameForge sent me a couple of period models that I could use to represent our principles. There’s nothing to stop you from making your own characters and importing them.
So once you’ve designed your environment I then know that if I put my Technocrane here, for instance, this is how many seats we will be losing, this is the line of sight implication for other people who are around that equipment on the night. So I can show the client the real implications and I can even show it to him in stereo. Imagine you’re sitting at the back of the stalls, this is what you’re going to see.
The programme is designed for a filmmaker who has had no immersion in 3D modeling before but in some ways it’s created a rod for its own back because it’s so complex in the detail; as I said before you can use particular dolly heads and so on.
Clearly they’ve put a lot of thought in to what the end user’s going to want but a little bit to their detriment because what’s happened is that it’s an absolutely perfect tool for saying ‘this is my camera position’, for making storyboards etc… what they’ve done, almost as an afterthought or a bonus actually, is to write in a simple bit of code that allows you to animate camera moves. But it’s sort of opening another can of worms, you’re opening another door of expectation by doing that because someone like me comes along and goes ‘Wow I can animate that so I can move my camera from there to there’. But of course my cast isn’t static while I’m moving my camera, I need to block them, they need to move. But it’s not animation software, I can’t make their legs move but just slide them in to place.
So you set up your shot, exactly the way you want it to be. You set your stereo parameters. Once you get in to having a lot of characters on stage, a lot of textures and lighting to render, FrameForge gives you some very clever and cool options to make that function much faster. You can pretty much block stuff where you want it and then what you can do is take a lot of these objects and then you can turn that object in to a block. So you’re saying to the computer everything is set the way I want it to be set, you can then turn it in to a cube. But when I take a snapshot, that snapshot will restore all of the optimum settings I want. So you’ll end up looking at your scene with funny looking ‘block people’ in it, low level lighting without shadows and from there it just makes it easier to set up your stereo because I don’t need to see the best textures in the world to set up my stereo. Or you can change your camera moves without waiting for the textures to render.
3D CAMERA SETTINGS
 Physical camera equipment collision warningsYou have an option of a side-by-side or beam splitter camera, they’re not specific on make at the moment. But there are preference settings, you determine what kind of chip size that camera is, full chip, 2/3rd chip, chip, is it film? What are the screen dimensions etc… You customise that around the parameters of the cameras you know you’re going to be using. You can even customise the ground glass, there’s a list of all the standard ground glass there is out there in the world and if that doesn’t suit you can customise it for your own needs. You can look through the beam splitter, you have an option to see it in 2D, again maybe usable to makes things faster for positioning purposes. Click it back in to the 3D and you can preview it any way that you want. I’m working off a laptop so I preview it in Anaglyph. I could preview it side-by-side and there are loads of other options for previewing and outputting.
Once you’ve set up your beam splitter, what I would advise anyone to do is to set up what your destination screen width is going to be. So I would say for the purposes of this pre-vis I’m going to set this up for a 20 foot screen. Then you have to decide what your maximum background parallax is. Say one percent, you don’t want to violate that. You can’t actually dial that in as a percentage so you have to do some maths based on the width of the screen. Once you’ve set those parameters you go to another little stereo option screen and then you can start to play with your IO and your convergence. What will happen is it won’t stop you from violating those parameters but it will tell you when you have.
What’s really cool about it is I’ll set it up more or less by eye, I’ll look and change my IO to exactly how I want it to look and get the right stereo. For something like this I would never exceed the 3% budget. So I’m looking at a maximum off screen offset of 2% with the background being at 1%. So literally you’ve got convergence and IO function that you just change, it’s that simple. There’s another little button, you press that’s just to preview your stereo settings and when you press that it brings up a window which will tell you ‘furthest object from camera is x metres away, nearest object from camera is x metres away, furthest stereo offset is 0.8%, your negative stereo offset is 1.8%’. It’ll tell you exactly what you’ve got in percentages and if you even forget to do that and you go to take a snapshot, if you’ve violated anything it’ll bring up that preview box again with a warning saying you’re stepping over the marks that you originally fed in.
PLAYING WITH STEREO
It’s a fantastic tool for someone who wants to learn how to use stereo and just be able to play with it and see for themselves what works and what doesn’t, what the implications of doing things are – a really good learning tool. It’s instant and it’s not like taking two frames and changing the horizontal image translation in Photoshop, you’re actually working with optics – this is what it looks like on a long lens, a wide lens from this particular distance.
It’s also a brilliant tool for showing the client. For people who can’t visualize that stuff, people who want to know if they’re taking a lot of seats out and want to know what they get back. You can say, sit down and watch this. The reaction I’ve had from everyone has been ‘Wow’! It has exceeded expectations.
It is definitely worth the money. It’s not an animation programme, first and foremost it’s really going to be worth it’s weight in gold in informing you where to put your cameras, how the shot’s going to look, previewing the stereo and also in addition to that it’s got a whole library of objects and characters and props so that you can build your scene as well very easily.


