Review: Blackmagic Design Da Vinci Resolve 12 Part Two
Posted on Oct 21, 2015
Resolve 12’s Automatic Shot Match
ADAM GARSTONE is on more familiar ground with the second part of his Resolve 12 review because it’s all about the grading, there’s not much new but what there is is worth the update
Although Blackmagic have put a great deal of work into the NLE side of DaVinci Resolve 12, it’s still its core grading functionality that most users know it for. As Resolve is already one of the most capable grading suites available, there is less scope for development here, but Blackmagic haven’t rested on their laurels.
Grading in Resolve 12 has benefitted from the user interface changes – the layout and fonts are clearer and crisper, and some of the weird interface features have been rationalised. For instance, the timeline beneath the clip display now shows the entire film, making navigating much easier, clips can show what CODEC they are and so on – in fact there is a host of tiny tweaks that are small in themselves, but add up to a faster and easier grading environment.
In addition to all these UI changes, there are three main new features.
 Resolve 12’s Tracking.
First up is the tracker. Resolve’s tracker has always been great, so I took the news that they had ‘improved’ it with some trepidation. Remember when they ‘improved’ Coke?
The new tracker is a true 3D, point cloud based system, which – Blackmagic claims – allows it to better match perspective movements. I tested it with a clip which has foiled most of the best trackers on the market. In the clip, the camera starts on a TV, tracks left to right, whilst panning right to left, zooming out and rising, ending up behind the TV showing a wide of a family watching. Resolve’s new tracker had no problem following the camera move – staying rooted to a plane on the front of the TV, and following the changing perspective nearly perfectly. The track would need a few manual tweaks if you wanted to composite an image onto the TV screen, but I know of only one other 3D tracker that has coped with this clip as well – and it costs about as much as recovering Matt Damon from Mars.
Operationally, the new tracker is as simple as the old. Simply set a Power Window™ (a mask shape to you and me), which can be an ellipse, rectangle, polygon, bezier curve or gradient, and then head over to the Track panel. Here you can enable and disable tracking of pan, tilt, zoom and rotation, as well as turning on the new 3D feature. There are track forwards and track backwards controls – one nice feature of the ability to turn on clip handles, so you can track beyond the beginning and end of clips, for those cases where you are exporting clips with handles back to youreditor. You can also copy tracks from one shape to another. This has the obvious benefit of not having to track every single shape, but it’s also sometimes better to track somewhere in the image that you don’t want to adjust (just because you’ll get a better track) and then apply that track to the regions you do want to adjust. Entering Frame mode allows you to track a single frame at a time (backwards and forwards) to simplify manual tweaking of the track. If your track is wondering off, just reposition it and keyframes will be automatically created, with smooth interpolation between them. In Interactive mode you can edit the points in the cloud that the tracker is using. The tracker (the old one, not the new 3D one) can also be used as a very effective stabiliser.
 Resolve 12’s new 3D keyer.
The second major feature is the new 3D keyer. The 3D refers to the fact that you select key colours from a 3D mathematical representation of all possible colours, rather than anything to do with 3D space in your images. You use plus and minus eyedropper tools to select colours in your image. These then build up the key colour that you use for grading operations, or you can add an Alpha output to your node graph and use the key to composite one image over another. There is an automatic spill suppression option, as well as various clipping, clean and feather controls to finesse your key. It isn’t as sophisticated a keyer as those found in dedicated compositing programs, but it does a fine job with reasonably well shot green-screen footage. I have frequently used Resolve to do things like change the colour of an actor’s shirt (when stealing footage intended for a different scene), so I’m looking forward to this far more flexible keyer.
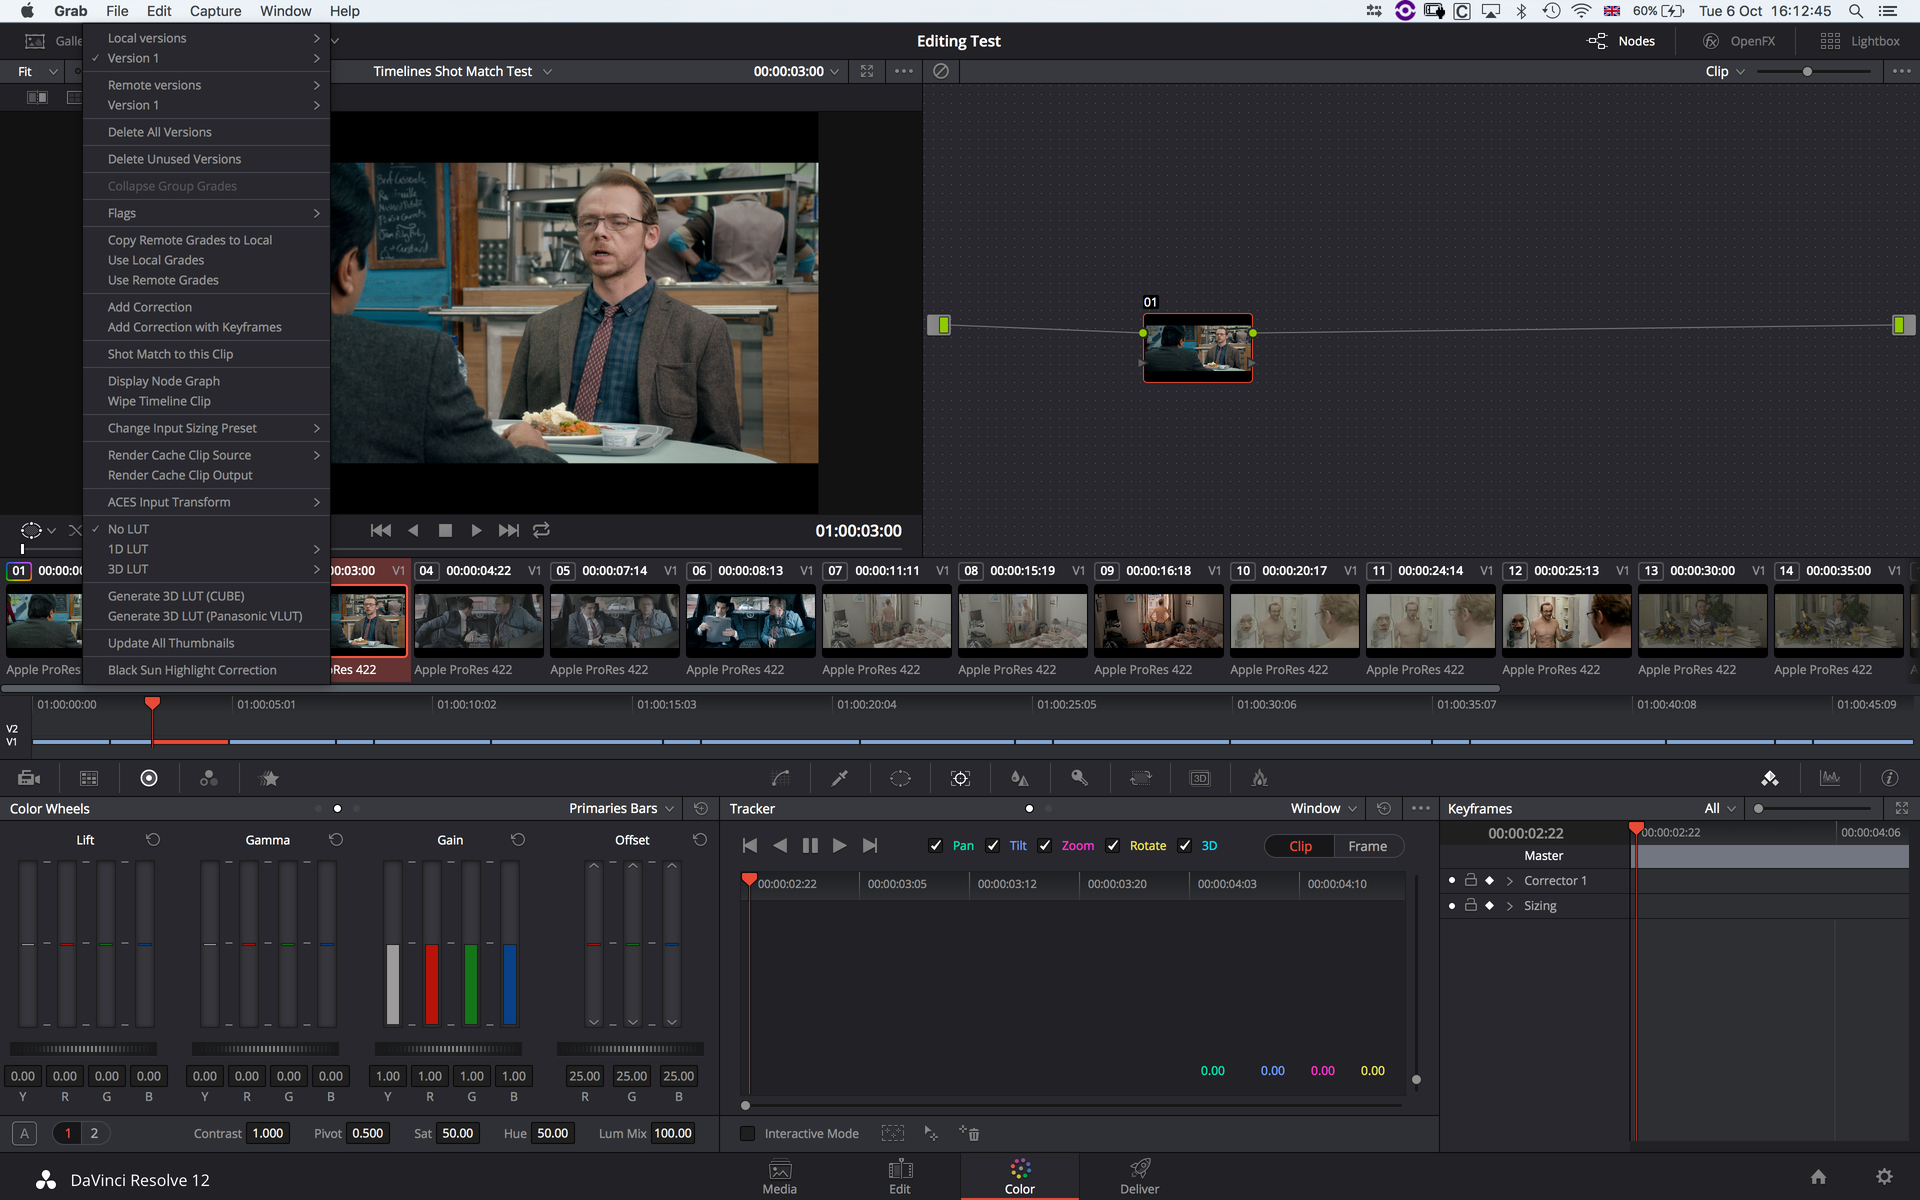
The final major new feature is Automatic Shot Match – and there are no prizes at all for guessing what it does. Simply select one or more clips that need to be graded, then right click on the clip you want to match and select “Shot Match to this Clip”. It’s worth noting that the match isn’t user editable – it’s applied to a node like a LUT, not by changing the primaries. The clever algorithm tries to ‘do no harm’ by avoiding clipping or anything else that will make the result look horrible. There are some caveats of course, for instance it doesn’t work well on un-normalised log footage or if you have already applied a lot of correction to the clips you are matching to. The results give you a good starting point, but they certainly aren’t perfect – is that a collective sigh of relief I hear from the world’s grading community?
Incidentally, the new UI makes the highlighting of selected clips much more obvious, with a sort of dark red film-strip look that I really liked
Of course, Resolve 12 has fixed a few bugs along the way – my favourite being that burnt-in data now scales properly with the output video size. Also, I had a weird problem in both Resolve 11 and the beta version of 12 whereby my computer would freeze for 15 seconds every few minutes due to some USB activity (associated with reading the Resolve Studio dongle). The full release of Resolve 12 seems to have cured the issue.
DaVinci Resolve just keeps going from strength to strength. It is hardly recognisable as the product that Blackmagic bought from the ailing DaVinci back in 2009. Its clean, new user interface, surprisingly capable editing features and incremental, but useful grading improvements mark Resolve 12 as one of those ‘must have’ applications – and the free version means that everyone can have it too.


